Understanding the Basics: Exploring Jetpack Navigation Component and Bottom Navigation.


I developed this news application( demo ) to display a list of news from all over the world using the newsapi as my source of data, and everything was working fine except the bottom navigation, which was unresponsive from there, my research to try to track down the underlying bug led me to write this blog as a solution.
In this article, we are going to develop a simple application to illustrate how to hook up bottom navigation with the Jetpack Navigation Component.
Let's get started
Open Android Studio, open a new project and name it navigation setup or whatever name suits you, and add the following dependencies in the build. gradle file:
    // Navigation Components
    implementation "androidx.navigation:navigation-fragment-ktx:2.3.5"
    implementation "androidx.navigation:navigation-ui-ktx:2.3.5"
Creating Fragments.
We will create three fragments, but first, we need an activity to act as a container for the fragments. So head over to Android Studio, create an empty activity, and name the activity MainActivity then go ahead and create three fragments and name them as follows Home Fragment, Notifications Fragment, and Saved Fragment, and the layout files will be automatically generated.
Creating Navigation Graph
To create the navigation graph, head over to the resource directory, create a new Android resource directory, and name it navigation. Inside it, create a navigation resource file and name it nav_graph.xml, then rebuild the project.
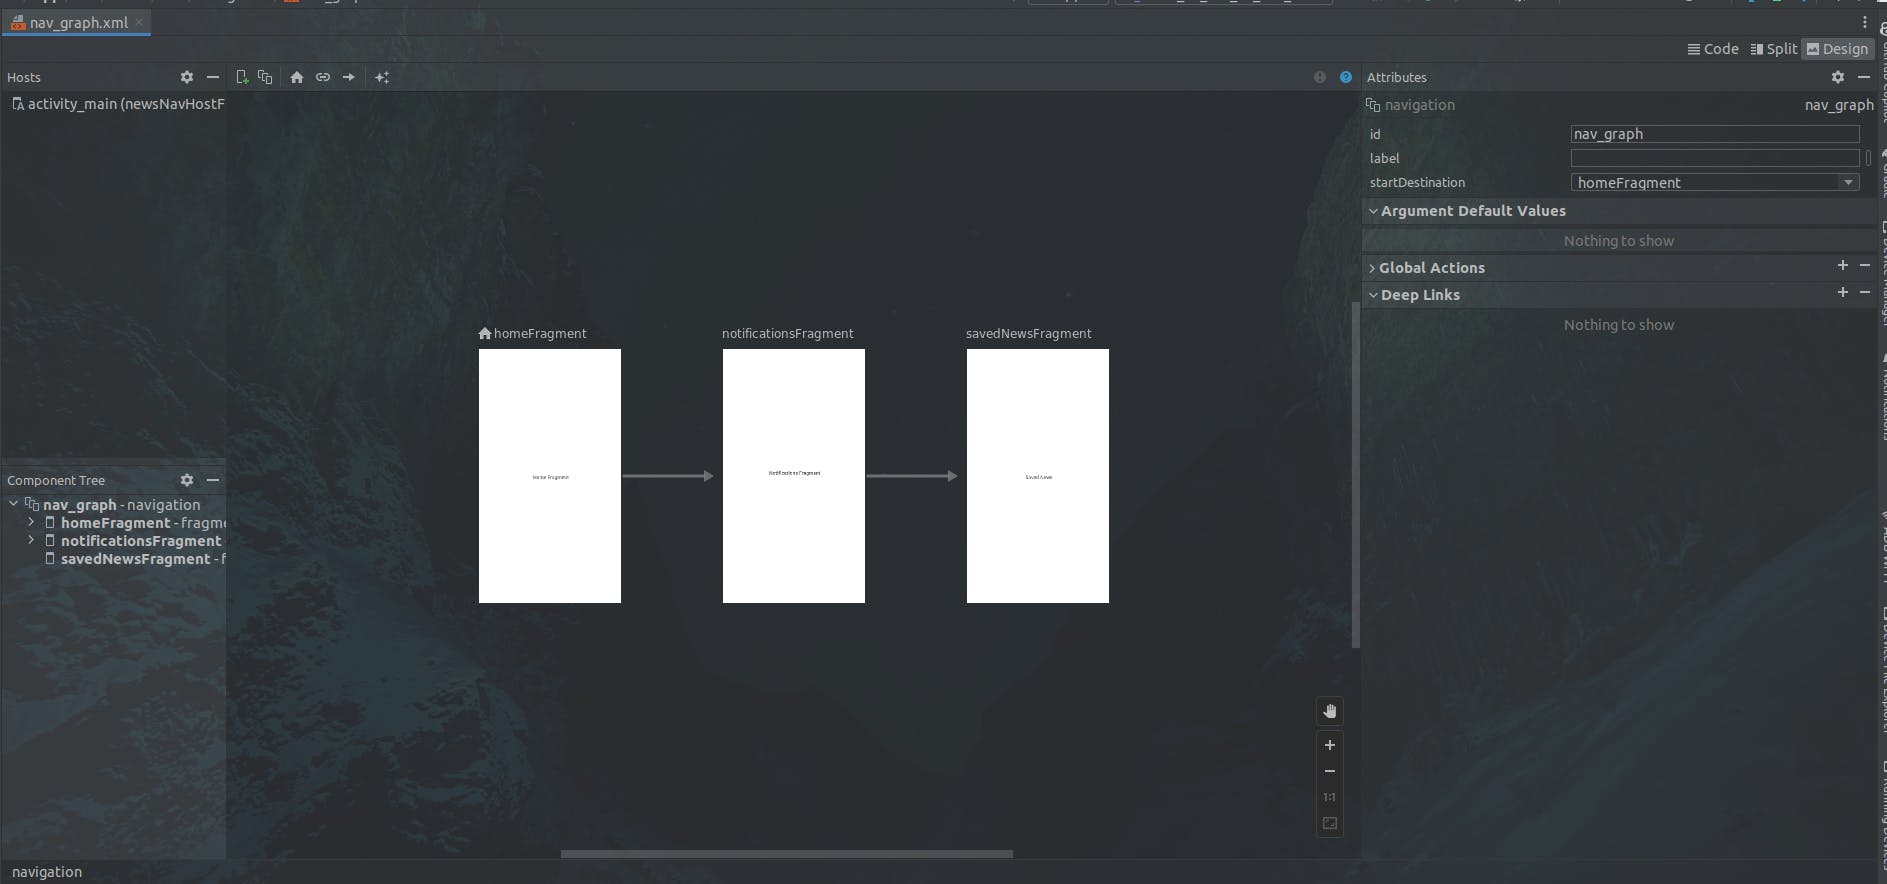
The above illustration represents our navigation graph from a design view. It may be different, probably without fragments, and so to add fragments, click on the top left plus (+) icon to add fragments and set the home fragment as the home fragment, meaning it'll be the first to be displayed whenever the app is launched. Make sure the three fragments have been added and open the same editor in code view on the top right and should be as illustrated below.
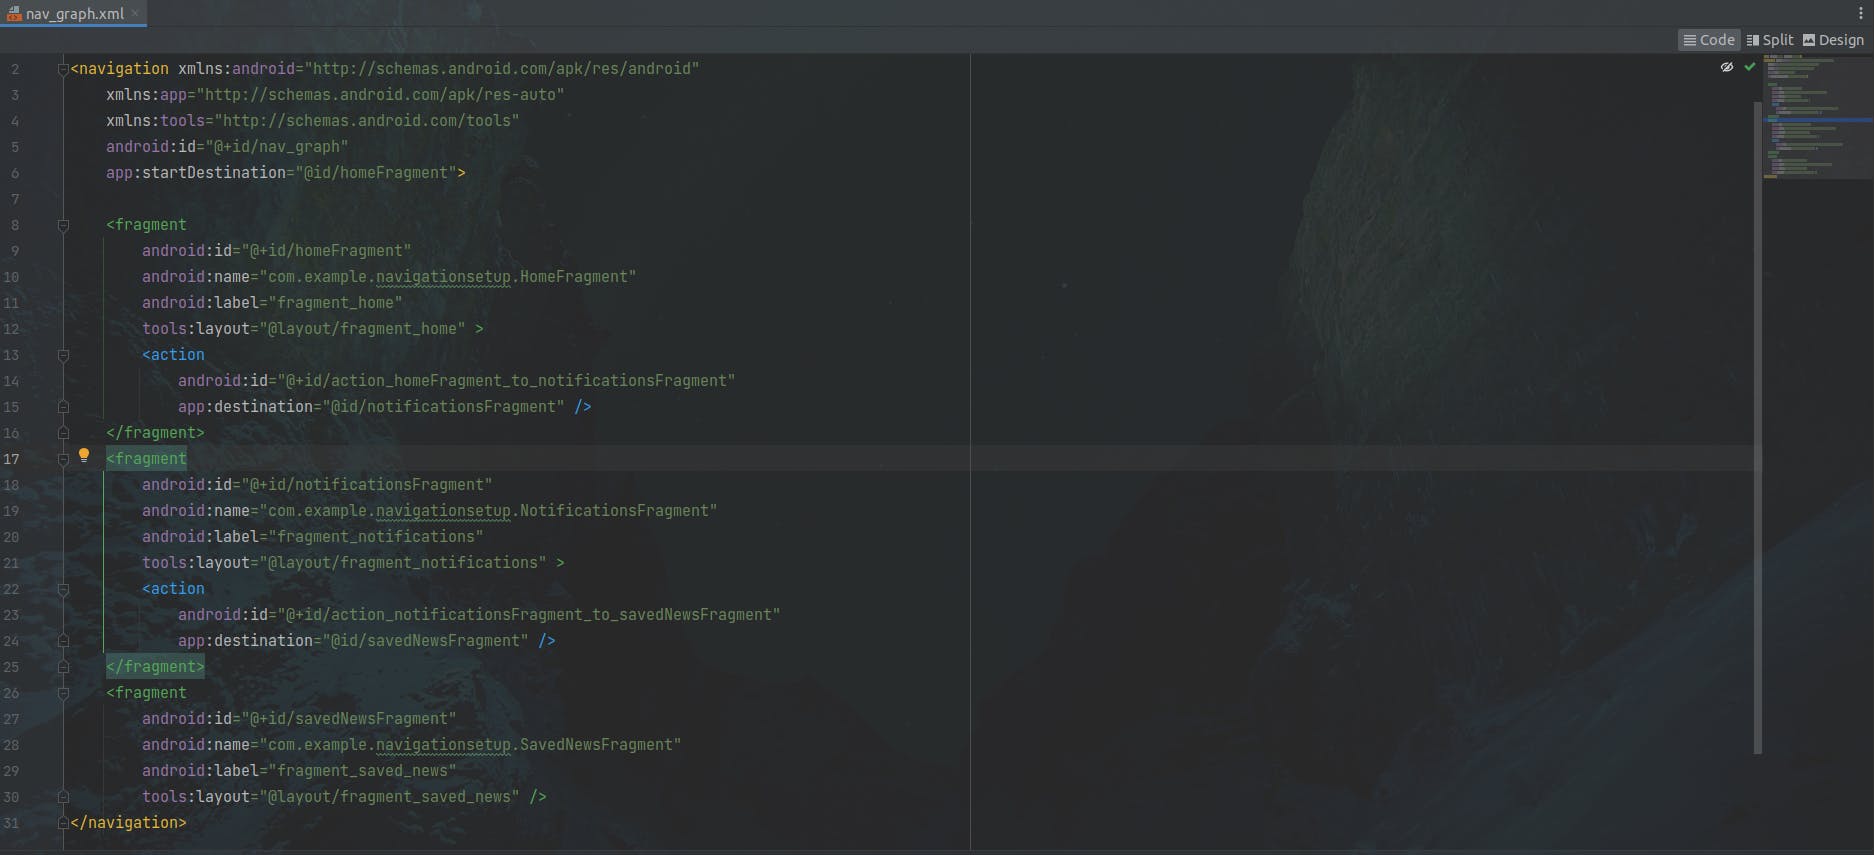
Let me provide the same in a code widget, just in case the illustration is not so clear.
<?xml version="1.0" encoding="utf-8"?>
<navigation xmlns:android="http://schemas.android.com/apk/res/android"
    xmlns:app="http://schemas.android.com/apk/res-auto"
    xmlns:tools="http://schemas.android.com/tools"
    android:id="@+id/nav_graph"
    app:startDestination="@id/homeFragment">

    <fragment
        android:id="@+id/homeFragment"
        android:name="com.example.navigationsetup.HomeFragment"
        android:label="fragment_home"
        tools:layout="@layout/fragment_home" >
        <action
            android:id="@+id/action_homeFragment_to_notificationsFragment"
            app:destination="@id/notificationsFragment" />
    </fragment>
    <fragment
        android:id="@+id/notificationsFragment"
        android:name="com.example.navigationsetup.NotificationsFragment"
        android:label="fragment_notifications"
        tools:layout="@layout/fragment_notifications" >
        <action
            android:id="@+id/action_notificationsFragment_to_savedNewsFragment"
            app:destination="@id/savedNewsFragment" />
    </fragment>
    <fragment
        android:id="@+id/savedNewsFragment"
        android:name="com.example.navigationsetup.SavedNewsFragment"
        android:label="fragment_saved_news"
        tools:layout="@layout/fragment_saved_news" />
</navigation>
If you've gone through the illustration you've noticed we have fragments id and action id. The action ID is generated whenever you change destinations in our navigation. If you switch to design view, you can drag arrows from one fragment and simply attach them to another, and this is what represents destinations in our application. If, for example, we have a button in the home fragment and you want, whenever the button is clicked, to open the notification fragment or transfer objects from one fragment to another using safeArgs, you must specify the destination using the arrows, and the action id will be generated, which will come in handy when you want to open another fragment programmatically.
Turn your focus on the fragment id because we will need them when creating the bottom navigation, the same id will be used to id the bottom navigation items, and if they aren't identical, the bottom navigation won't work.
Bottom Navigation
First, we are going to create a simple navigation view for our application and then attach it to the main activity which acts as a container for our fragments
Create a menu resource file and name it* bottom_navigation_view
<?xml version="1.0" encoding="utf-8"?>
<menu xmlns:android="http://schemas.android.com/apk/res/android">
    <item android:id="@+id/homeFragment"
        android:title="@string/home"
        android:icon="@drawable/home_24"/>

    <item android:id="@+id/savedNewsFragment"
        android:title="@string/saved_news"
        android:icon="@drawable/ic_save"/>

    <item android:id="@+id/notificationsFragment"
        android:title="@string/notifications"
        android:icon="@drawable/ic_notifications"/>
</menu>
Now let's add this to our main activity XML file, and before adding, make sure the ids of the items above match the navigation fragment ids as described earlier on.
Now let's patch things up by connecting the bottom navigation graph with the navigation component in the main activity XML file and we are going to start by adding the fragment container view and this acts as a placeholder for hosting our fragments within the main activity and facilitates the addition and removal of fragments within the activity dynamically, as illustrated below.
   <FrameLayout
        android:layout_width="match_parent"
        android:layout_height="0dp"
        app:layout_constraintBottom_toBottomOf="parent"
        app:layout_constraintEnd_toEndOf="parent"
        app:layout_constraintStart_toStartOf="parent"
        app:layout_constraintTop_toTopOf="parent"
        app:layout_constraintHorizontal_bias="0.5">

        <androidx.fragment.app.FragmentContainerView
            android:id="@+id/newsNavHostFragment"
            android:name="androidx.navigation.fragment.NavHostFragment"
            android:layout_width="match_parent"
            android:layout_height="match_parent"
            app:defaultNavHost = "true"
            app:navGraph = "@navigation/nav_graph"/>

    </FrameLayout>
app:navGraph = "@navigation/nav_graph"This serves as the most important tag as it references the navigation graph we created above which defines the structure and connection between different screens and their designated destinations.
Now let us have our bottom navigation view which we will place in the main activity XML file for ease of navigation by the user.
   <com.google.android.material.bottomnavigation.BottomNavigationView
        android:id="@+id/bottomNavView"
        android:layout_width="match_parent"
        android:layout_height="wrap_content"
        app:menu = "@menu/bottom_navigation_view"
        app:itemBackground="@color/white"
        app:itemIconTint="@drawable/bottom_selector"
        app:itemTextColor="@color/black"
        app:layout_constraintBottom_toBottomOf="parent"
        app:layout_constraintEnd_toEndOf="parent"
        app:layout_constraintHorizontal_bias="0.5"
        app:layout_constraintStart_toStartOf="parent"/>
This is how the whole main activity XML file will look like.
<?xml version="1.0" encoding="utf-8"?>
<androidx.constraintlayout.widget.ConstraintLayout xmlns:android="http://schemas.android.com/apk/res/android"
    xmlns:app="http://schemas.android.com/apk/res-auto"
    xmlns:tools="http://schemas.android.com/tools"
    android:layout_width="match_parent"
    android:layout_height="match_parent"
    tools:context=".MainActivity">

    <FrameLayout
        android:layout_width="match_parent"
        android:layout_height="0dp"
        app:layout_constraintBottom_toBottomOf="parent"
        app:layout_constraintEnd_toEndOf="parent"
        app:layout_constraintStart_toStartOf="parent"
        app:layout_constraintTop_toTopOf="parent"
        app:layout_constraintHorizontal_bias="0.5">

        <androidx.fragment.app.FragmentContainerView
            android:id="@+id/newsNavHostFragment"
            android:name="androidx.navigation.fragment.NavHostFragment"
            android:layout_width="match_parent"
            android:layout_height="match_parent"
            app:defaultNavHost = "true"
            app:navGraph = "@navigation/nav_graph"/>

    </FrameLayout>

    <com.google.android.material.bottomnavigation.BottomNavigationView
        android:id="@+id/bottomNavView"
        android:layout_width="match_parent"
        android:layout_height="wrap_content"
        app:menu = "@menu/bottom_navigation_view"
        app:itemBackground="@color/white"
        app:itemIconTint="@drawable/bottom_selector"
        app:itemTextColor="@color/black"
        app:layout_constraintBottom_toBottomOf="parent"
        app:layout_constraintEnd_toEndOf="parent"
        app:layout_constraintHorizontal_bias="0.5"
        app:layout_constraintStart_toStartOf="parent"/>


</androidx.constraintlayout.widget.ConstraintLayout>

The only thing remaining is heading over to the main activity and configuring the navigation controller to connect with the bottom navigation and that's pretty easy as you see below.
class MainActivity : AppCompatActivity() {
    override fun onCreate(savedInstanceState: Bundle?) {
        super.onCreate(savedInstanceState)
        val binding = ActivityMainBinding.inflate(layoutInflater)
        setContentView(binding.root)

        setUpNavigation(binding)
    }

    private fun setUpNavigation(binding:ActivityMainBinding){
        val navHostFragment = supportFragmentManager.findFragmentById(R.id.newsNavHostFragment) as NavHostFragment
        val navController = navHostFragment.navController
        binding.bottomNavView.setupWithNavController(navController)

    }
}
Now let's go through the above code snippet the setUpNavigation() to be precise.
We use
supportFragmentManagerto locate a specific Navigation host using its id and then perform a type-casting operation to convert our navigation to aNavHostFragmentclass type and if this operation is not successful you will encounter aClassCastExceptionerror to check your code and try casting again.To manage navigation between different fragments we use the
navControllerobject which is going to retrieve the controller associated with our fragments.We then set up our
bottomNavViewwith ournavControllerto handle our navigations defined by the destination actions in ournavController.
That's it and congratulations on hooking the bottom navigation with the navigation component graph, run the program, and try navigating through different screens.
Keep learning, practicing, and staying consistent.
Happy coding guys!